
Virtual reality is incredibly immersive and a blast to play with. The Oculus Quest 2 has made it more accessible than ever before. Of course, the moment I put it on, I immediately wanted to make my own games and got started with UnityUnity is a game engine that makes it easier to build a fully functioning game (including physics, collisions, rendering, and much more) that works on multiple platforms. There are many freely available game engines but the most popular are Unity and Unreal Engine. There are lots of articles on Unity versus Unreal Engine versus building your own engine entirely from scratch using Oculus Native support. For me, my goal was to get something running as quickly as possible. Harder decisions later.. Best practices for setting up your environment and building a game have changed frequently enough that it can be hard to find current tutorials and examples without getting confused.
Mac versus Windows
If you are using Windows, you are in luck: many of the tutorials and videos you’ll find assume you’re working on Windows. I’m using a MacBook Pro. This can create some challenges but the biggest challenges are around the platform support for the Oculus Quest itself. Oculus doesn’t make a version of it’s Oculus Desktop app (or libraries) available on MacOS. Because of this you’ll usually want to start with tutorials that are specific to the Mac and adjust. This post will try to focus on what works in both environments.
Getting started
We’ll be using Unity to develop our game. Unity is constantly releasing new versions and new features. Because of this it is very common to have multiple versions of Unity installed (for different projects). Luckily this is easy to manage using Unity Hub. Download Unity Hub and install itCan't you just download and install a specific version of Unity instead of Unity Hub? Of course. But even if you only plan to use one version of Unity forever, Unity Hub is still extremely useful for configuring your installation..
Once you have installed Unity Hub, you’ll need to install a version of Unity.

I generally try to install the latest Official Release. Even though the LTS (long term support) versions are guaranteed to receive updates they won’t necessarily have all of the newest features. Choose a version and click the “NEXT” button.
When building a game for Oculus Quest (which uses a custom Android operating system internally), you’ll need to use a version of Unity with Android Support and OpenJDK. Select the Android Build Support option (and all sub-options):

I also select Mac Build Support and Documentation. If you’re not sure if you’ll need something, you can always add modules later. Click the “NEXT” button.
You’ll need to agree to the Android SDK and NDK License Terms from Google:

Check the box and click the “DONE” button. The installation should take a few minutes.
Setting up a basic project
In Unity Hub, click on Projects on the left, then click on the New button. Create a new project with the Universal Render Pipeline selected:

The project should open and have a default scene in it.In many of the screenshots you'll notice I am using the Tall layout. I tend to prefer this layout but you can choose whatever layout you want. To change the layout click on the Window menu, click Layouts then choose Tall. If you want to use this default construction scene that is okay (and in some cases more interesting) - it simply takes longer to build the scene and recompile. For our purposes, we don’t care about this scene and want to start with a blank canvas.

Delete the following:
Assets/Scenes/SampleSceneAssets/Scenes/SampleSceneLightingSettingsAssets/ExampleAssetsAssets/TutorialInfoAssets/Settings/SampleSceneProfile
We’re ready to create our scene. In the Scenes folder in Assets, create a new scene called Game (select the folder, then right-click in the blank panel and select Create and then click Scene):

Double click to open it.
Installing packages
Before we can build our game for the Oculus Quest, we’ll need to add some packages. Some of the packages we’ll need are very new. In current versions of Unity, you’ll need to show the preview packages. To do this we’ll need to enable preview packages in the Project Settings. Open the Edit menu and choose Project Settings.... Select Package Manager on the left then check the Enable Preview Packages checkbox:

You may see a warning that the packages are “not ready for production.” Click “I understand”:

Open the Package Manager by clicking on the Window menu and choosing Package Manager. Once open, change the packages filter to Unity Registry:

Find the XR Interaction ToolkitWait - what is "XR". XR is short for "cross-reality" - and is the abbreviation for games and projects that support both VR (virtual-reality) and AR (augmented-reality). package, select it, and click install:

You might see a warning about the “new input system package”:

Click “Yes” (which will restart Unity).
Re-open the Package Manager and find the XR Interaction Toolkit package again. Open the Samples sub-menu in the package and import the Default Input Actions and the XR Device Simulator.

Find the OpenXR Plugin package, select it, and click install:

Install the Android Logcat plugin as well:

Setting up the XR Plugins
Open the Edit menu and choose Project Settings.... Select XR Plugin Management on the left.

Click, Install XR Plugin Management (note: depending on your version of Unity this step might already be completed and you can skip it).
Once loaded, you’ll see a list of tabs including a desktop tab and an Android tab (the small robot icon). Select the Android tab:

This is where things get a little weird.
Check the Open XR box. You should see a red warning icon next to the name of the plugin. Click it:

On the popup, click Fix All:

If you are working on a Mac you should still see an error and at least one warning:

Perhaps you are reading this at a time where this error has been solved, but for now it is blocking. Even if we could get this to work we would run into another OpenXR problem when running our game on the Oculus QuestAt the time of this writing if you you attempt to run an OpenXR game on the Oculus Quest it won't look right. The game will be running in a small window on the Quest (and in some cases will appear completely black). This is because of problems with how the android-manifest.xml is constructed. More information can be found here.
Uncheck the OpenXR box and check the Oculus box:

You might be wondering why we ever checked the OpenXR box at all? Eventually this will help us setup interaction profiles for our controllers which is a good practice going forward.
Let’s do that now.
Click the OpenXR sub-item on the left.

Under Interaction Profiles, click the + icon and add the Oculus Touch Controller Profile item:

Setting up the presets
Now that we have all of the plugins installed, we want to setup the controls. Luckily, there are defaults for all of the action based inputs we would want to map. Back in the project Assets, open the Samples folder, XR Interaction Toolkit folder and within the specific version folder, find the Default Input Actions folder.

Click on each item in the folder and click the Add to... button at the top of the inspector if there is one (the XRI Default Input Actions item will not have an add button):

Once you’ve added all of the defaults, open the Project Settings again and choose Preset Manager. Find the ActionBasedController section and next to XRI Default Right Controller type the word Right. Next to the XRI Default Left Controller type the word Left:

Building the scene
To get started, we’ll want to setup our scene so that our headset is tracked and is used as the primary camera. In general, this is the way VR works: think about your eyes as cameras that are filming the world. As your head moves around your eyes move as well. In Unity we’ll create a camera that tracks your head position and update the rendered view accordingly.
In the Hierarchy tab create a new empty object called Controller (to do this, right click on the Game node, select GameObject from the menu and choose Create Empty; then name the newly created object Controller):

Within that object, right click and create a new XR Rig (Action Based) object.

When you do this it will automatically remove the Main Camera object from the Hierarchy. The XR Rig contains prebuilt objects for tracking the position and direction of the VR headset (attached to the new sub-object called Main Camera). It also contains objects that track the positions of the left and right controllers. The XR Rig component contains everything we need to enter into virtual-reality as a player.
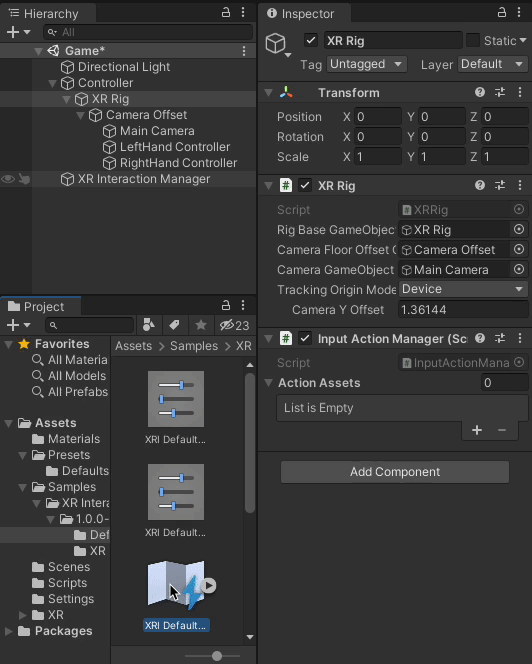
Select the main XR Rig object and then set the Tracking Origin Mode to Device in the Inspector.
Then click Add Component and select Input Action Manager:

Back in the Samples folder, drag the XRI Default Input Actions object onto the Input Action Manager object’s Action Assets list (drop it onto the Action Assets title).
Creating a basic world
We’ve created enough for our player to put on their headset and be in the world - but we haven’t actually created anything for them to see. Let’s add a basic platform for them to stand on and a table.
Right click on the Game scene node in the Hierarchy panel, select GameObject then create a new 3D Object, Cube:

Name it Floor. Set the scale to 100, 1, 100:

Create another new 3D Object, Cube and name it Table. Set the Z position to 10 (so it is 10 meters in front of the camera) and set the X scale to 10 so it appears like a long desk and set the Y position to 1 so it is sitting on the Floor.

We’ll need some materials for the objects (so we can see them). Select the Materials folder in your Assets and create a new material and name it Black. Set the Base Map color to black:

Make another material called Red and set the Base Map color to red:

Drag the Black material into your scene view and drop it onto the Floor object. Drag the Red material into the scene view and drop it onto the Table object.

Testing out what we have
At this point we could run our game by pressing the ▶️ button in Unity to see how it all works. By default the game will start (Unity will switch to the Game view) and we’ll see the red table in front of our first-person player. But we can’t move or look around. We could add controls to do this but we’re trying to build a game for VR so let’s focus on that.
Building and deploying the application to your Oculus Quest
To utilize Oculus and Facebook features such as social integration and user avatars, you’ll need a Facebook account (starting with Oculus Quest 2) and an Oculus Developer account (free, but starting in February 2021, you need a Verified Developer Account which requires a payment method on file). Go to https://developer.oculus.com and sign up using your Facebook account. You’ll also need to setup your device for developer mode. To do this you’ll need to:
- Join or Create an Oculus Developer Organization (part of your Oculus account)
- Enable Developer Mode on your headset
- Plug in your USB cable and Allow USB DebuggingThe USB cable that comes with the Oculus will work for development. An Oculus Link cable will also work. In general, any data-capable USB-C cable should work. If you are having trouble you might want to check the cable. Also, if you have an Oculus Elite Strap (or another external battery pack) make sure your USB cable is plugged into the headset itself, not the battery pack.
- Install the Oculus ADB Drivers (Windows only)
The instructions on the Oculus website explain how to do each of these steps.
Once your Quest is in developer mode and plugged in, you can configure your project.
In the File menu, choose Build Settings... and click Add Open Scenes. Then click on the Android platform option and change the default texture compression to ATSCI've skipped most of the platform specific changes you can make but changed the texture compression. Why? Changing this later can be very slow. Because of that I tend to do it as early as possible in the process.. Then click Switch Platform:

Next, click on the Player Settings button. With the Player item selected in the left sidebar, find the Other Settings sub-panel. Expand the panel and scroll down to Minimum API Level. Oculus requires that this be set to at least API level 23 as a target:

Click Build and Run in the Build Settings window, choose a name when saving the game and get ready (I’ve called my game Hide-and-seek even though there isn’t really any hiding or seeking):

Once you save the game it should start compiling the application. This generally takes a few minutes to complete the first time (if you have a very complex scene with advanced shaders and lighting it can take much longer) but will be quicker on subsequent runs. Eventually the progress dialog will say Deploying player. At that point your Oculus Quest should pause what it is doing and switch to a screen that says Made with Unity then your game should start.
When the game starts on the headset, Unity will connect to the logs from the headset and display them in an Android Logcat window (because we installed the Android Logcat plugin into our project). The logging is almost constant but can be filtered. This is a cumbersome way to get debugging information from the headset as you play - but it is the only way to do it on MacOS. On Windows you can use the ▶️ button in Unity to start the application in development mode on the headset. This is not possible on MacOS because there are no Apple-compatible Oculus drivers and applications.
Our game is not very exciting (we don’t even have hands!), but from this point you should be able to make changes in Unity, then click the File menu and choose Build and Run. Your new changes will be compiled and a new version of the game (the compiled APK file) will be deployed to the headset and the game will restart.
Writing a script
So far we haven’t needed to write any code for our game. Eventually, though, we’ll want some customization and game logic. C# is the default coding language for Unity. You can use any coding editor to work on your scripts but most people use Visual Studio or VS Code because of their advanced auto completions.
I tend to use VS Code. If you don’t have it, download and install it from https://code.visualstudio.com/download. On MacOS you’ll need additional tools to support .Net and C#. Install mono from the mono-project website.
Then open VS Code (if you already have VS Code open, restart it). You’ll want to install the following plugins:
- https://marketplace.visualstudio.com/items?itemName=ms-dotnettools.csharp
- https://marketplace.visualstudio.com/items?itemName=Unity.unity-debug
- https://marketplace.visualstudio.com/items?itemName=Tobiah.unity-tools
- https://marketplace.visualstudio.com/items?itemName=kleber-swf.unity-code-snippets
- https://marketplace.visualstudio.com/items?itemName=YclepticStudios.unity-snippets
Edit the Extension Settings of the C# plugin (click on the gear icon) and set the Omnisharp: Use Global Mono setting to always:

In addition to the Omnisharp: Use Global Mono setting, you may need to set an explicit path to the mono binary. Doing this will avoid any discrepancies with your global PATH setup. You can do this directly in the settings.json (to find this, you can search for the Omnisharp: Mono Path setting):

Because I downloaded the pkg installer and installed Mono globally, I used /Library/Frameworks/Mono.framework/Versions/Current/bin/mono (you can find this by running which mono in a terminal). After saving the settings, reload the editor. With these settings you should be able to see code completions and compilation errors but you won’t be able to use the debugger and may see the following warning:

For now, choose to ignore this warning and do not install the SDK.What if you click on Get the .NET Core SDK and download and install it? At the time of this writing the current major version if v5.0.302. If you are using an M1, Apple Silicon MacBook the SDK will install but you may not be able to debug properly. This is fixed in the upcoming 6.0 version of the SDK. For now, I completely removed the SDK (and then restarted).
More information and options are available at https://code.visualstudio.com/docs/other/unity (note, you should not need to install any additional language packs with the latest version of Mono).
Next, open the Unity Preferences and choose Visual Studio Code as the External Script Editor:

Let’s start by creating a script in Unity so we can try it out. In the Hierarchy, select the XR game object. In the inspector click Add component, type Logger then choose New script, name it Logger and click Create and Add.

Once the component is created click on the three dots to the right and choose Edit Script:

The script should open in VS Code:

Let’s edit the script to add some debug logging into the Update method:
using System.Collections;
using System.Collections.Generic;
using UnityEngine;

public class Logger : MonoBehaviour
{
    // Start is called before the first frame update
    void Start()
    {

    }

    // Update is called once per frame
    void Update()
    {
        Vector3 pos = transform.position;
        Debug.Log("Update: " + pos);
    }
}
As you start to type you should see an auto-complete window:

Once you’ve added the log message, save the file and return to Unity. You’ll notice there is a small delay as Unity recompiles the code when the Unity window regains focus. Once the code is recompiled you can Build and Run.
More advanced ways of connecting to your headset
Unity relies on the Android Platform Tools (Android SDK) to connect to the headset, deploy games and start them. The Android Debugging Bridge (or adb) gives you access to a number of additional tools including a command line interface to the Quest. It isn’t required, but I tend to use it.
If you are working on Windows there are some instructions available; read Enable Device for Development and Testing. On a Mac, in a Terminal, run:
brew install android-platform-toolsOnce installed, attach your Oculus via USB-C and run:
adb connectIn some cases the version of adb you install is different than the version that is used in Unity. This can lead to unexplainable errors either in Unity or in the Terminal. In most cases it simply causes one of the two tools to repeatedly lose its connection to the Oculus Quest. To work around this, there are a few options, but the simplest is to copy the adb binary from the Unity installation to /usr/local/bin.
You can find the path in the Unity Preferences window (in the platform-tools folder inside of the Android SDK path):
Copy the path, then change to that folder (your path will probably be different):
cd /Applications/Unity/Hub/Editor/2020.2.1f1/PlaybackEngines/AndroidPlayer/SDKThen copy the adb binary:
cp platform-tools/adb /usr/local/bin/Re-connect:
adb connectChecking the logs
We’ve been using the Android Logcat plugin in Unity to see the logs, but you can also view the logs from terminal. The logs are verbose so it is sometimes helpful to start by clearing them:
adb logcat -cThen check them:
adb logcat -dUsing System.Debug statements in your application will output information to the logs making it a useful way to see what is happening in your program.
Connecting via Wi-fi
So far, all of our interaction with the Oculus Quest has required it to be plugged in via USB-C cable. Luckily, you can also connect via Wi-fi. First you’ll want to make sure that the device is connected via USB:
adb devicesYou should see something like:
List of devices attached
12345999M92373	device
Once you’ve got the device connected you can check it’s local IP address:
adb shell ip routeYou should see something like (the IP address at the end is what we are looking for):
192.168.86.0/24 dev wlan0 proto kernel scope link src 192.168.86.99Now setup tcpip for the connected device and tell it to listen on port 5555:
adb tcpip 5555Once you’ve done this the device is still connected to USB and your computer is communicating via
USB but it is also listening for tcpip connections via Wi-Fi. Connect to it via Wi-Fi:
adb connect <ipaddress>:5555At this point you can unplug the USB cable and you should still be able to work with the Quest via
adb over Wi-Fi. This includes compiling and deploying to the Oculus Quest from Unity. You can also continue to check logs over Wi-Fi. For example:
adb logcat -dIf you want to explicitly connect to a particular Quest you can specify the server with -s:
adb -s <ipaddress>:5555 logcat -dTo go back to using USB, plug in the cable again and connect:
adb connect usbDisconnecting
If you get an error about the connection you can usually run:
adb disconnectIf that doesn’t work you can do the more extreme:
adb kill-serverAnd then run the adb connect commands again. In some cases (when using USB) it is helpful to disconnect the USB cable and reconnect.
Seeing what the player sees
Though you could use the built in casting functionality for the Oculus Quest you might find it doesn’t always reflect what the player sees (especially if there are differences per-eye). Luckily the scrcpy program allows us to stream the player’s view. Install it:
brew install scrcpyThen run:
scrcpy -c 1440:1550:0:0

This should attach a view for a single eye. Be careful! Sometimes what you see in the scrcpy window doesn’t always perfectly match what the player sees on the Oculus Quest. If you want to see both eyes you can just use scrcpy without any additional parametersscrcpy or Screen-Copy is part of Genymobile and can be found https://github.com/Genymobile/scrcpy#mac-os. There are options for other platforms as well. See also: https://note.mu/masaki_ponpoko/n/nc759f6499c79.
More learning
I’ve used other resources when learning. I’ll list some of them here:
- The Ultimate Guide to Game Development with Unity 2019. This course costs between $10-12 if you catch it on sale. I highly recommend it if you are just getting started. It clearly explains how to move around the Unity interface, how to move quickly, and basic concepts of scripting.
- Using the new Terrain Tools: Speed up your work with the new Terrain Tools Package.
- Using GitHub Desktop to Manage your Project and How to use GitHub with Unity (youtube).
Comments
Thanks for reading ❤️ – comment by replying to the issue for this post. There’s no comments yet; you could be the first.
There’s more to read
Looking for more long-form posts? Here ya go...